I've been doing a lot of reading on Vintage-Mustang.com lately and came across a suspension modification that I wish I had learned about when my car was in pieces--The Shelby/Arning Drop. You can read all about the history of how it came about and how it was implemented by Carol Shelby on his Mustangs by going to THIS website, but all you need to know for my blog is that it drops the upper control arms (UCA) down 1" and towards the rear of the car 1/8" on the 65-66 models. Although this lowers the front of the car, its main purpose is to improve handling by raising the "roll center" of the suspension causing the suspension to resist body roll.
I already purchased the 1" front lowering springs and had them installed which meant that I had to pull them back out of the car in order to drop the UCA to drill the new holes. I actually had to make a run down to Auto Zone to pick up a spring compressor that worked from the inside of the spring rather than the outside of the spring due to the limited space between the fender apron and the spring. Once I had the driver spring off I un-bolted the UCA and pivoted it out of the way.
 |
| Driver's Side UCA Off |
I printed the template for the UCA drop off of the Glazier Nolan website and used that to mark my holes. The template wasn't quite wide enough to line up perfectly with both existing holes although when I measured, I found that the 1" and 1/8" measurements were accurate.
 |
| UCA Drop Template |
I used a razor blade to cut out holes in the template where the existing bolts where and put a bolt through the template and the fender apron on the side I first punched and then did the same thing on the other side. Once I was done I had my marks to begin drilling. My right hand mark ended up slightly too far to the left, but I compensated for that by widening the hole.
 |
| Driver's Side Apron Marked |
I started with a very small drill bit and used about five different drill bits before arriving at the last size. I thought my dad would have had a 17/32" drill bit since he has just about every tool you can think of, but alas he didn't so I finished with a 1/2".
 |
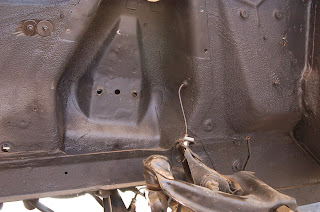
| Driver's Side Apron with UCA Drop Holes |
Once I had the holes finished and the UCA lined up perfectly I slid it back in, bolted it up (without shims since I have a whole new front end and need to have a complete alignment done.) I haven't purchased front shocks yet so you won't see the shocks sitting inside the spring just yet.
The other side went much faster since I knew exactly what I was doing now. I followed the same process and touched up the areas that were drilled or damaged with some flat black paint. I set the springs back in when I was done. I'm hoping to have tires and rims in the next couple of months at which point I should also have the paint on the car done. I can't wait to get the car aligned and see how well it handles with this new suspension upgrade! The last piece that I'll want to put on the front end will be a 1" sway bar for even more responsive handling.
 |
| Passenger's Side with UCA Drop Complete |


Great work!
ReplyDelete