I swung by the Electronics Warehouse in Riverside to pick up a relay socket, rely, fuse panel, and wire in order to install the keyed hot fuse panel to run the additional items that needed to be run. The fuse panel holds six fuses and it is powered by a standard 5-prong 40 amp relay that is powered by an 8 gauge red wire that comes directly off of the positive battery side.
Right now I have three things running off of the new fuse panel:
- Electric choke on the Edelbrock 1406 carburetor
- Override switch for the electric fans
- Tachometer
I labeled each of the wires so that I know which one goes to which item. I figured that I would forget otherwise since they're all red. The keyed power source for the relay is the ignition switch off of the fuse block. I'll probably move over the volt gauges to the switched wire box too the next time I'm over. The less I have on the solenoid the better.
This is the schematic that I used to know where I was supposed to wire everything:
This is the schematic that I used to know where I was supposed to wire everything:
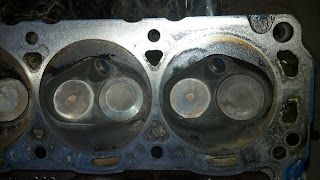
My dad took the passenger side head by the shop today and they told him that everything checked out okay--in other words there were no cracks or leaks. He pulled off the other head and will take it down tomorrow to have them check it out. There was one discolored spot on one of the heads that looked like it could have been caused by a water leak. It is the far right cylinder in the below picture. The top portion inside the gasket is a little redish which could have been caused by water. If there is a leak there, that would explain the pressure building up in the cooling system.
Here is a picture of the other side of the motor torn down:
While my dad was pulling off the other head, I had already gotten started on running the wiring for the additional keyed hot fuse panel in order to install the new Equus 8068 tach that I bought to match the other aftermarket gauges under the dash. It took a little while to get all of the wires properly run, but it was done right. I mounted the relay and the fuse block to the firewall under the dash in a spot that was still easily accessible to change fuses if necessary.
I had to use a large clamp to mount the tach to the steering column, but I cut a thin piece of rubber to fit underneath the clamp to act as a cushion between the clamp and the column. It looks quite nice with the other gauges (although I still need to wrap the wires to keep it cleaner looking.
I made sure to install the green bulb covers on the tach before I took it over to my parents house so that it matches the dash lights and the additional lights under the dash. Here is a picture taken with my phone so it's harder to capture the brightness of the gauges, but you get the general idea.


No comments:
Post a Comment