Saturday, March 17, 2012

Engine Running Again

Lauren had to work this St. Patrick's Day so I went to my parents house to work alongside my dad and get the motor put back together on the Mustang and get it running. We had to make a couple of trips to Auto Zone in order to get the correct drive belts. Both the alternator and power steering belts were a little too long causing them to squeal although they were as tight as they could go. I don't know it's application, but the alternator belt is a Duralast V-Belt #15390 part #303842 and was $8.99. The power steering belt is a Duralast V-Belt #15490 part #304154 and was $8.99. I discovered that the vacuum advance was hooked up to a dead port on the carburetor. In other words, there was no vacuum off of the carburetor so the hose to the distributor was doing us no good. Once we hooked it up to the other port on the front of the carburetor it bumped up the idle a good 500-600rpm. We were then able to adjust it back down. 


I pulled a lot of the wires under the hood that were on running off of the starter solenoid keyed power source and hooked them up to the new fuse box that I ran under the dash. I ended up moving the wire for the electric fan relay, and volt gauge to the fuse box under the dash. I completely disconnected the amp gauge in the dash because it always reads right in the middle anyways.


While I had the car up in the air I changed the speedometer cable and wrapped the exhaust pipe on the driver's side since it is hear the clutch cable, speedometer cable, fuel line and parking brake. I also bolted up the exhaust pipes to the headers.

I hooked up the tachometer to the coil wire since I don't have an MSD ignition box to hook it up to. The switched power is run off of the extra fuse box. The tach seems to run smoothly and appears to read accurately. Once it's warmed up it has been idling around 500-600rpm. 


Both heads were checked and there were no leaks in either. We re-installed them with new gaskets and all appears to be normal. I think we can chalk up the pressure problem to having a bad head gasket.  There was no sign of bubbles in the overflow tank. My dad is going to adjust the valves tomorrow and I'm going to adjust the toe since both tires are currently pointed outward instead of 1/8" inward.

Tuesday, March 13, 2012

Motor Troubles Continued and Tach Installed

I swung by the Electronics Warehouse in Riverside to pick up a relay socket, rely, fuse panel, and wire in order to install the keyed hot fuse panel to run the additional items that needed to be run. The fuse panel holds six fuses and it is powered by a standard 5-prong 40 amp relay that is powered by an 8 gauge red wire that comes directly off of the positive battery side.


Right now I have three things running off of the new fuse panel:
  1. Electric choke on the Edelbrock 1406 carburetor
  2. Override switch for the electric fans
  3. Tachometer
I labeled each of the wires so that I know which one goes to which item. I figured that I would forget otherwise since they're all red. The keyed power source for the relay is the ignition switch off of the fuse block. I'll probably move over the volt gauges to the switched wire box too the next time I'm over. The less I have on the solenoid the better.

This is the schematic that I used to know where I was supposed to wire everything:


My dad took the passenger side head by the shop today and they told him that everything checked out okay--in other words there were no cracks or leaks. He pulled off the other head and will take it down tomorrow to have them check it out. There was one discolored spot on one of the heads that looked like it could have been caused by a water leak. It is the far right cylinder in the below picture. The top portion inside the gasket is a little redish which could have been caused by water. If there is a leak there, that would explain the pressure building up in the cooling system.


Here is a picture of the other side of the motor torn down:


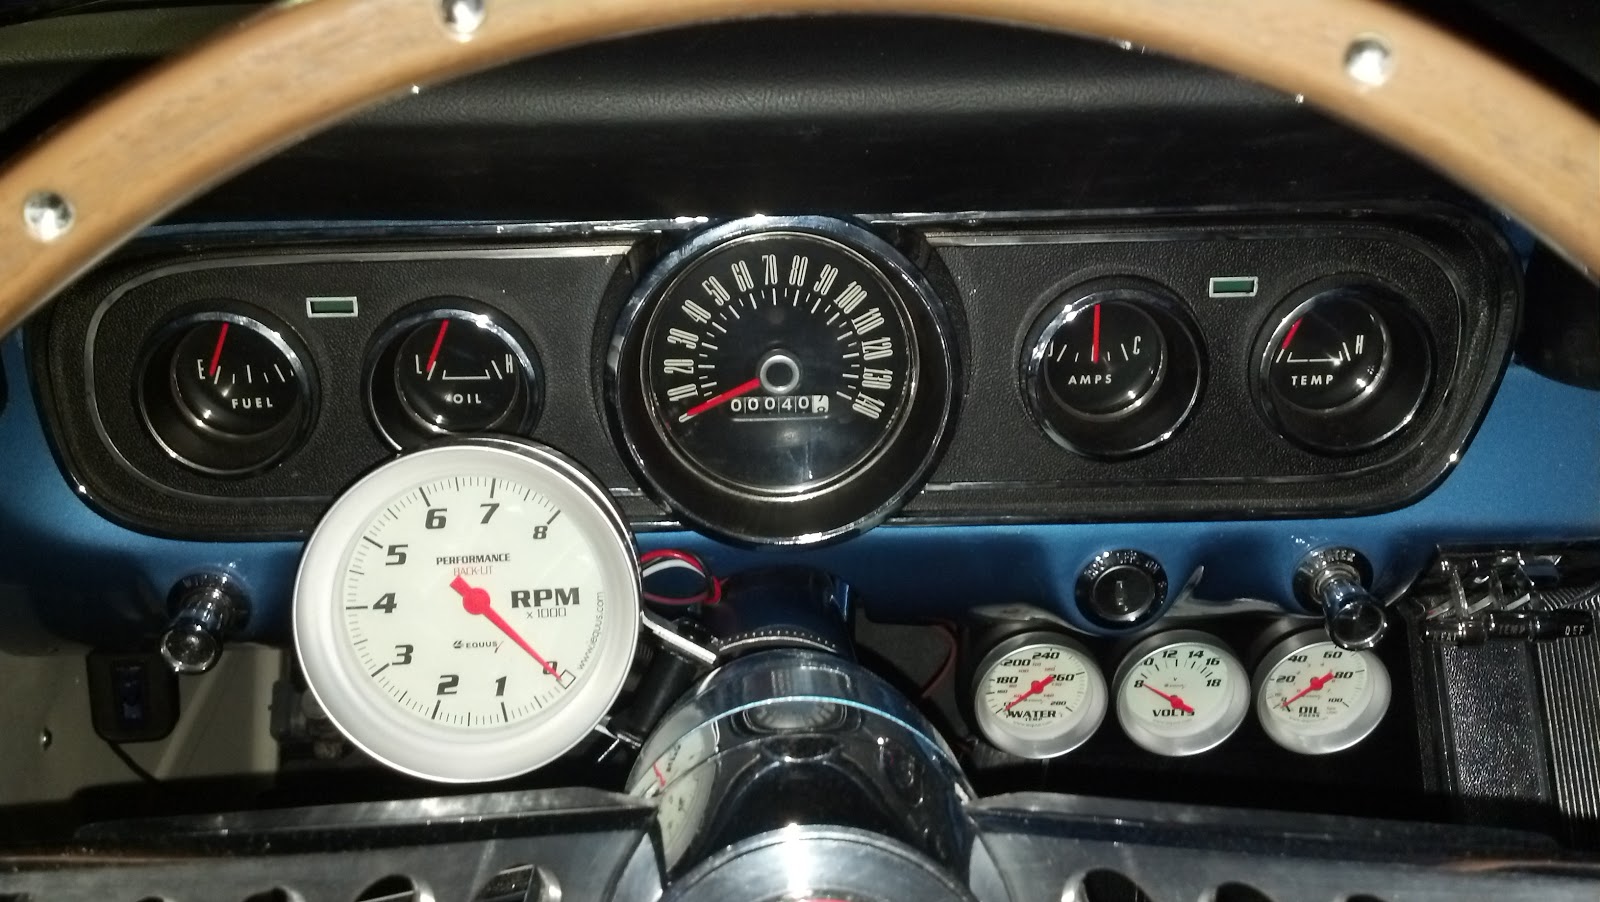
While my dad was pulling off the other head, I had already gotten started on running the wiring for the additional keyed hot fuse panel in order to install the new Equus 8068 tach that I bought to match the other aftermarket gauges under the dash. It took a little while to get all of the wires properly run, but it was done right. I mounted the relay and the fuse block to the firewall under the dash in a spot that was still easily accessible to change fuses if necessary.

I had to use a large clamp to mount the tach to the steering column, but I cut a thin piece of rubber to fit underneath the clamp to act as a cushion between the clamp and the column. It looks quite nice with the other gauges (although I still need to wrap the wires to keep it cleaner looking.


I made sure to install the green bulb covers on the tach before I took it over to my parents house so that it matches the dash lights and the additional lights under the dash. Here is a picture taken with my phone so it's harder to capture the brightness of the gauges, but you get the general idea.


Monday, March 12, 2012

Motor Troubles

It appears that I have pressure in my cooling system because the overflow tank is filling up so much that it is dumping out onto the street while I drive which is draining most of the coolant in the radiator while I drive. The overflow tank looks like it's boiling (even when the motor is off), but the water temp in the overflow tank is only around 130 degrees (according to the laser temp reader). My dad thinks that it could possible be a crack in one of the heads. We didn't have them pressure checked while they were off and instead only had them planed.  Before I pulled apart the motor tonight, I took a video of the exhaust system which I think sounds perfect.


We started by pulling each spark plug out to see if there was any water in any of the cylinders. We didn't see any water. Next we pulled the distributor and then all hoses and other things in the way of pulling off the intake manifold. We checked the seals to see if there was any sign of a breech between the water port and the exhaust port. 


We then looked at the heads to see if there were any tell tale signs of a leak. We didn't see anything that would make us suspect that anything was amiss.
 

The last thing we did after dropping off the passenger side header was pull the head to take it down to the machine shop and have it pressure tested for cracks. These heads were rebuilt about 12 years ago and had minimal miles put on them and then were re-sealed and planed about a year ago so they should be good, but we've got to figure out what the problem is and this seems to be a good place to start.
 

If the passenger side head checks out, we'll pull the driver side head to have it pressure tested. If that comes out good then I'm not sure what comes next...the block???

First Drive to Work

I decided to drive the Mustang to work today (35 miles each way in Southern California) and it was pretty nice. The only downside was that I don't have a worked speedometer in the car nor do I have the tachometer hooked up. I work 5am-2pm so I was on the road while it was dark. I'm looking forward to the drive home since it will be daylight and I'll get to see other people's reactions to the car.


The oil under the car isn't from the Mustang. It doesn't appear to have any serious oil leaks that would cause that kind of stainage.

Since cutting the front springs to help the front end settle down, it looks like the camber has begun to go negative (which is a good thing):


Before I had positive camber which isn't desirable. Not that it has gone negative, I can have my buddy set it properly. I'm told that it should be between -2 to -3 degrees. It looks like the tires have moved outwards whereas they had been aligned to have toe in. I guess that's what happens when you lower the suspension of a car. I should be able to have the car realigned tomorrow.


Saturday, March 10, 2012

Exhaust Install

I had my wife follow me to SoCal Mufflers in Riverside today so that I could drop off the 'Stang and have the exhaust system installed. The owner of the shop was the one installing the exhaust and he told me that it would only take two hours to install which I thought was great. Unfortunately it took a little longer than two hours to install...it took closer to five. I ended up walking back down there from my house to pick it up before they even called me. Once I arrived at the shop, I could see the owner taking a video of the exhaust while it was still on the rack. It did turn out pretty good.
  1. 2.5" alumanized steel pipe
  2. X-pipe 
  3. Dynomax Ultraflo mufflers with 2.5" offset inlet-2.5" center outlet
  4. Pipes over the axles and turned down right before the valance.
Total cost for the mufflers and to have the exhaust run= $143(mufflers) + $343(pipes) or $486 with tax.

Dynomax Ultraflo's of '66 Mustang

 '66 Mustang X-pipe
Here is a video I took this morning. Sorry about the belt squeal...its the power steering belt and I plan on getting it fixed soon.

Thursday, March 8, 2012

Passenger Door Panel & Other Fixes

I should have had a softball game tonight but there is some sort of tournament going on that prevented regular games from happening tonight so I got to work more on the Mustang. I feel like I accomplished a good amount this afternoon/evening. I stopped by the local DMV to pick up the month tag that they neglected to give me when I was there getting my personalized plates on Monday. I literally walked in and walked out with my tags in under three minutes.

I headed to my parents and got to work right away on installing the door panel since I installed the window regulator Tuesday. First I cut a piece of plastic to fit behind the door panel like I did for the other door and then used caulking to seal the door openings. I poked holes for the door clips and the arm rest base. I lined up each door clip and then started putting them in one at a time. The handles went on fairly quickly as did the arm rest base.


If you remember from my "Frustrated" entry, the passenger side headlight only worked intermittently. I installed newer style Halogen headlights although they are a sealed headlight like the older ones were. Hopefully this corrects the headlight flickering problem that I had on the passenger side.


If you also remember my frustration about the dash lights not working, I figured out what the problem was after pulling the dash apart. One problem was the ground had come disconnected on the back of the gauges. The second problem was that the fuse box is slightly corroded and was preventing a good connection for the fuse which stopped power from flowing to the dash. I think I've got both issues corrected now. I added the green covers to the extra tri-pod gauges so that they would match the dash gauges (blue covers with yellow incandescent bulbs.)


We also took care of at least one other important issue tonight. My dad bought a threaded sleeve to connect the end of the adjustable clutch cable rod to another extension piece  in order to make it so that the clutch isn't partially disengaged when the pedal is fully out. Before the clutch was never fully engaged and when you started to depress the pedal, it would immediately disengage the clutch. Now the clutch begins to engage closer to the bottom of the pedal rather than all the way at the top. I only rolled forward and backward in the driveway, but didn't get to take it for a test drive. I'll be picking it up tomorrow evening so that I have it here and ready to take to the exhaust shop Saturday morning.

Update 09/02/13: A new clutch setup was installed including a longer 96-04 Mustang cable. The post about it is HERE.

Unfortunately the speedometer cable was melted through right at the point that the open headers drop off the exhaust. while I had the gauges out of the dash tonight I unhooked the cable from the back of the gauges and will replace it once I have the pipes ran this weekend. Fortunately the cable is only about $20 at any local auto parts store.

Next on the agenda is to run a keyed hot fuse box inside the car from a relay in order to run some extra wires (i.e. electric choke).  I'll also need to polish the car again and put a fresh coat of wax on it as well as get the windshield guy to seal it correctly (3rd times the charm).

Wednesday, March 7, 2012

Cut Springs & Window Regulator

Since the front of the car still sat too high despite the Shelby/Arning drop and the 1" lowering springs and after reading some posts on vintage-mustang.com I decided to cut about 2/3 of a coil (about 10.5") off of each side. I marked the coil at 1/2 and 3/4 and split the difference. A full coil measured at roughly 17" which puts the cut at 61.7% of a full coil.


This was a picture of the front end before I got started. This was after the alignment was done as best as it could have been done. The gap between the highest point of the tire and the bottom fender lip in the picture below is roughly 2.5".


This is a picture after I cut 10.5" of the coil off and put the car back together and then drove it to settle the suspension. The gap between the highest point of the tire and the bottom of the fender lip is now 1". I think its important to note that the tires are set in enough so that they don't touch the fender and the fender lips are rolled at the top anyways. The suspension could possibly settle another 1/2" or so.


'66 Mustang


I also had the opportunity to remove the old regulator and install the new Scott Drake one that I bought from CJ Pony. I removed about eight bolts and took out the entire assembly (regulator and scissors) in order to install the new one. The regulator is held onto the scissors with a small metal spring clip. I made sure to put a lot of grease on the pivot points and the regulator spring.


The window now rolls all of the way to the top and the gaps are great. There is almost no gap between the rear quarter window and the front window.