Friday, December 31, 2010

Headers Refinished

Since its the last day of 2010 and Lauren had to work, I went over to my parents house to work on the Mustang for about half of the day. Petey hasn't had any seizures since the last blog and seems to be doing great now. He did a little tanning while I worked on the car.


Today I started off by pulled Calvin's old Hedmann headers off the shelf of the garage and gave them a little TLC. They were covered in rust and as you can see, they were in dire need of some attention:

At first I just used a green scouring pad to clean them up, but figured that it would take a long time to clean up both headers so I switched to using an air tool that my dad has scouring pads for. I cleaned up both headers and they got pretty clean:

I had stopped by Autozone on my way to my parents house this morning so that I could pick up a can of high temp flat black paint for the headers. Fortunately it was only about $9.18 with tax. I also stopped by Vons to pick up some pre-made guacamole for the bean dip that we plan on taking to Mama Gail's house for the new years eve bunko bash. Once I had the surface rust cleaned off of the shorty's, I used some ether and a rag to clean off all grease to create a clean surface ready to accept the new paint (2,000 degree):

Once I was finished painting and allowing them to hand dry, I started working with my dad in seeing if the 1967 Mustang drive shaft would fit in my car with the T5 conversion yoke. Unfortunately the car only had 1/4" of free play which is far too little. According to all the sources I've found, there needs to be between 3/4" - 1" of free play. We only tested the driveshaft while the car was in the air with no weight on the rear suspension, so we'll probably need to try it again with a jack under the differential allowing the car's weight to rest on the leaf springs.

Since we werent' going to get anything done with the driveline today, I decided to clean up the power steering pump and put the rebuild kit in it. I didn't get any "before" pictures of the pump, but I had cleaned it up about 5 months ago only to let it rust again. We used a pulley puller to get the pulley off and I cleaned off all the new rust. We pulled apart the pump and put in some new seals and then put it all back together. It was a fairly quick process since we only had to replace seals and o-rings. I put a coat of black paint on it and its now ready to mount on the motor. All we have to do now is find a power steering pump bracket!

Saturday, December 11, 2010

Droppin' in the Drivetrain


Today was one of Lauren's weekends to work in December so I packed up Petey (since he had two seizures last night) and took him on over to my parents house to do some more work on the Mustang. He seemed pretty content sitting out in the sun while I worked.


This was the day that we were going to join together the 302 motor and T5 transmission and slip it into the car. The first thing we had to do was set up the hoist and take the motor off of the engine stand. Once we did that, we pulled out the transmission to get it for instillation. We had to install the pilot bearing before doing anything else so we cleaned out the hole in the back of the motor and applied some grease to work it in. We then set the engine spacer plate onto the back of the motor and then bolted on the flywheel. Once we had the flywheel on, we were able to mount the clutch and pressure plate which went pretty smooth.


Newly threaded bellhousing
Next we looked through buckets of bolts to find the bolts we would need to join the bell housing to the back of the motor. Once we found the six bolts we needed, the bell housing went on fairly quickly It took us a while to find the right sized bolts to hold the transmission body onto the housing because we were searching for a bolt that didn't exist. The previous owner of the housing must have put the wrong sized bolts in and stretched out the threads causing the ones that were supposed to be used to fit loosely and the next higher size bolt to be too big. Our only option was to re-thread the bell housing.


Bolting up the transmission to the 302
Once we tapped the four holes we were able to join the transmission body to the motor. You can see me trying to put in one of the bolts through the transmission and into the bell housing. We had tried to fill the trans with fluid, but failed to realize that the hole for the spedo-cable allowed most of the fluid we put in to leak out. I'll have to look into which cable it needs (1966 Mustang of 1986-1992) before trying to fill it again.


When we raised the drivetrain using the engine hoist and lowered the front of the car to make sure we had enough clearance to move the engine into the engine compartment. It barely scrapped its way in taking off a little black paint off of the oil pan, but it made it in. We had to put it in sideways with the rear of the transmission pointing towards the drivers side and the engine entering the compartment from the driver's side. Once it was over the radiator support, we lowered it in and began setting the motor mounts.

My dad did most of the work under the car by trimming the T5 conversion cross member to clear the e-brake bracket. He also had to drill the cross member because the hole on the passenger's side didn't perfectly line up with the hole in the body. While he did that, I greased and slid on the harmonic balance and put on the valve covers. Once we had the the transmission mounted, we were pretty much done for the night. I tried to wipe down the engine compartment since it was getting dusty. I also touched up some of the brake lines that had lost some of their paint.


Top view of the shifter coming through the floor
Although the T5 works great in older Mustangs, the shifter doesn't line up perfectly with the hole in the floorboard. Sometimes the hole needs to be trimmed in order for it to work properly. I think we got lucky with my car because it seems to just barely fit. Once we install the driveline we may find that we need to trim it, but for now it works. The picture to the right shows that it is closer to the front passenger's side corner (as it fits in all older Mustangs).


Motor all bolted up!
The 'Stang is coming along nicely. I'll probably need to spend some money on it now to buy things like a radiator, alternator, battery, distributor, spark plug wires, water pump, hoses, air filter, oil, etc, etc. For now its looking beautiful and I'm excited to get it running soon.

T-5 Info


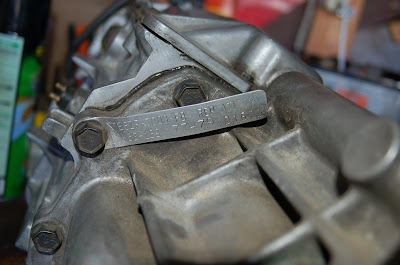
For some reason, it took me a while to find the ID tag on the T-5 that I purchased from Romeo in Los Angeles on June 30, 2009, but I finally found it while cleaning it a couple of months ago. He told me that the transmission was from a 1988 5.0 which could very well be correct since the ID number places it as being built for a 1986 1/2-1989 Mustang 5.0. The input shaft spins freely in all gears, but we still don't know the real condition of it since we haven't actually used it yet. We'll see how it works once we get the clutch cable installed and the motor fired up. Below is a chart with the gear ratio details and torque rating:


In Summary:

Max Torque= 265 ft/lbs
1st Gear= 3.35
2nd Gear= 1.93
3rd Gear= 1.29
4th Gear= 1.00
5th Gear= 0.68
Reverse= 3.15


The transmission now has a new bearing retainer seal and rear seal so its not as if I didn't do anything to the transmission after purchasing it. I have the T-5 conversion yoke for it because I bought it some time in 2002 or 2003 when I still had my first mustang. I intended to do a T-5 conversion, but then decided to sell the car due to high maintenance costs and high gas prices. I also had the cross member from around the same time period. It saved me from spending an extra $175 or so. If only I had purchased the clutch cable kit back then, I would have saved myself from spending $200 now.